
 Christmas 2026
 Cookies for Santa! Create the Cutest Christmas Banner ✨🎄
Featuring Sharon Hankins
Bring a little handmade magic to your Christmas décor! Turn three simple wooden banner pieces into an adora...


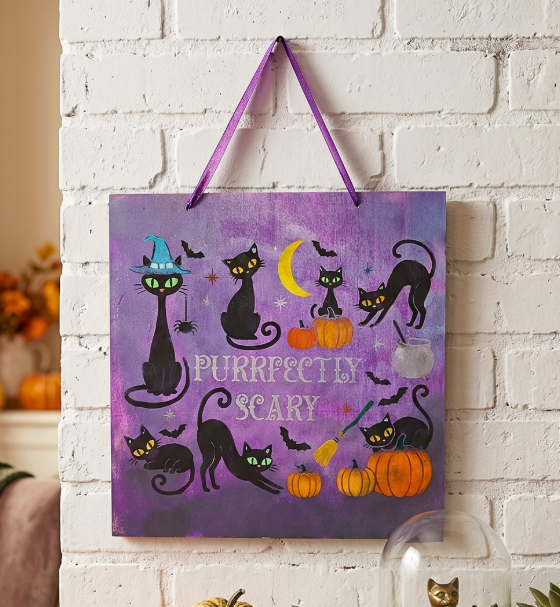
Ready for a little Halloween creativity? Tammy from Cheers to Creativity is here with a fun Purrfectly Scary project featuring black cats, colorful eyes, pumpkins, bats, and plenty of spooky details.
The layered stencil makes it easy to build the design one color at a time. A metallic purple background adds dimension, while bright accents make the cats and Halloween details pop.
This square Halloween sign gets its spooky look from a rich purple background, colorful painted details, and the Purrfectly Scary Stencil.
Start by painting the entire square panel board with purple paint. A regular household sponge works well for quickly covering the surface. Don’t forget the sides of the board so the finished piece looks polished from every angle.

While the purple base is still slightly damp, bring in metallic purple and metallic white paint. Pounce the metallic white into the center of the board, then blend it outward into the purple.
Keep the edges darker and gradually work toward a lighter center. This simple light-to-dark blend gives the background extra dimension and helps the stencil design stand out.

Allow the background to dry completely before moving on to the stencil.
Position the first layer of the Purrfectly Scary Stencil on the board and secure it with tape.
Load a mini stencil brush with black paint, then offload the excess paint before stenciling. This helps prevent paint from bleeding underneath the stencil.
Fill in the cats, bats, and spiders with black paint.

Use another stencil brush to fill the stars, cauldron, and the words “Purrfectly Scary” with silver paint.

For the pumpkins, start with a light layer of white paint. A small sponge works well here.
The white base is especially helpful over the purple background because it gives the orange paint a brighter surface to sit on.
Once the white has dried, add different shades of orange. Use darker orange on some pumpkins and lighter orange on others to keep the design from looking too uniform.

Now it’s time to bring in some fun Halloween colors.
Let the paint dry completely before carefully lifting the stencil.

Once the first layer is complete, grab a detail brush and some white paint. Add a few small lines inside the cats’ ears for extra dimension.
This is also a good time to look over the design and make any small touch-ups needed.

Carefully position the second layer of the stencil. Use the registration marks to line it up with the existing design.
Add silver to the cat’s hatband and pink to the kitty noses.

Start by lightly filling in the eyes with white paint. Let the white dry before adding the brighter colors. This gives the green and orange eye colors a clean base and helps them stand out against the purple background.
Once dry, randomly add bright green and orange to the cats’ eyes. Mixing the eye colors gives each little cat its own personality.

This spooky project was created by Tammy Muto of Cheers to Creativity. Tammy’s style combines colorful paint choices with approachable stencil techniques, making this Halloween design easy to customize with your own favorite colors.
Her playful color combinations give these floating cats plenty of personality while keeping the project simple and fun.
And there you have it—a Purrfectly Scary Halloween sign filled with black cats, glowing eyes, orange pumpkins, silver details, and a dimensional purple background.
The layered stencil does much of the design work, while the color choices let you make the finished piece completely your own.

Ready to make your own spooky sign? Grab the Purrfectly Scary Stencil and your Mini Stencil Brush Set, then choose your own Halloween color palette and get painting!
Watch the full project tutorial:
Christmas 2026 Featuring Sharon Hankins
 Halloween
 Featuring Melissa Miller
 Halloween
 Featuring Amanda Dillon