
Rustic Anchor Board DIY Tutorial
This coastal-inspired project comes straight from ambassador Amanda Dillon of Mettle Modern Design, who shows how to transform an 8×10 board into a rustic anchor sign. By embracing imperfections, layering stain and paint, and using the Anchor Stencil, you can create a simple, sellable piece perfect for your home or shop.
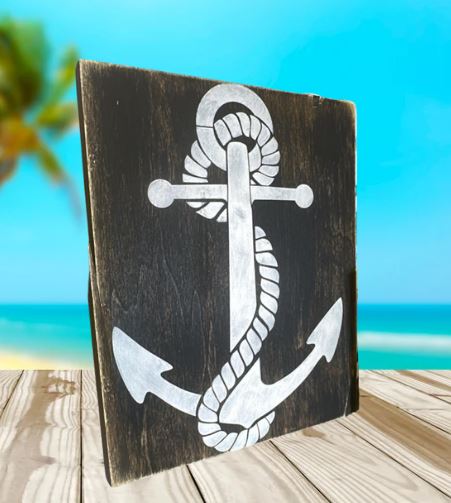
Rustic Anchor Board
Amanda finished this coastal piece using simple supplies. The result is a rustic, wearable look perfect for beachy shelves, tiered trays, or market-style displays.
Materials
- 8×10" wood board (Amanda used an imperfect/rustic board)
- Anchor 12×12 Stencil — To the Beach and Back 12x12 Stencil
- Brown stain (Legacy Brown or similar)
- Stain sponge
- Blue paint (Prussian Blue hue or navy) + black paint (mix to desired navy)
- Flat/chip brush for dry brushing
- Stencil Brush Set — Pure Natural Bristle Stencil Brush Set
- White paint for the anchor
- Coarse sanding pads and fine sanding block
- Heat gun / blow dryer (optional — speeds drying)
- Painters tape or a few small weights to hold stencil
Step-by-step Instructions
-
Stain the board:
Start with an 8×10" board. Apply a brown stain with a stain sponge and make sure to stain the sides. Let dry thoroughly.

-
Sand smooth:
Once stain is dry, sand the surface lightly to smooth and remove any raised grain.

-
Mix paint for a navy dry brush:
Mix a small amount of black into your Prussian blue (or chosen navy) to get a deep, moody hue.
-
Dry brush the board:
Use a chip or flat brush to apply the blue/black mix with a dry brush technique. Build the coverage gradually — you can be light or heavy depending on desired rusticness.

-
Distress the edges:
After paint dries, aggressively sand edges and any natural wear points to pull back color and reveal warm wood tones.

-
Stencil the anchor:
Position the anchor stencil. Using a stencil brush, apply white paint in a swirling/pouncing motion. Add a second coat for bolder color.

-
Final sanding & finishing:
Once stencil paint is dry, sand lightly with a fine block for a smooth, natural finish.

-
Reveal:
Step back and admire the rustic anchor. This piece is intentionally imperfect — which is its whole charm.

Helpful Tips
- Embrace imperfections. Amanda recommends working with the board’s character rather than fighting it.
- Start light with dry brush & stencil coats. You can always add more paint — it’s harder to remove it without sanding.
- If your board might be displayed on a shelf or tray, stain the back so it looks finished from multiple angles.
- Use a heat gun or blow dryer to speed drying between layers when you’re short on time.
- Stencils can be slightly larger than the board; trim the design visually with placement.
Want to try this look? Grab the anchor stencil and stencil brushes below.
Anchor 12×12 Stencil — To the Beach and Back | Stencil Brush Set — Pure Natural Bristle
If you enjoyed this tutorial, follow Amanda at Mettle Modern Design for nightly lives and more coastal projects.