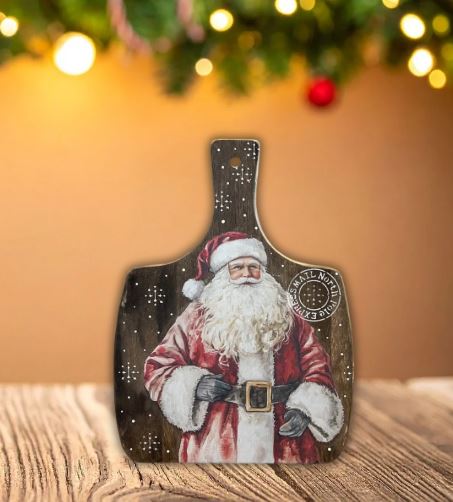

Make a cozy, market-ready Santa cutting board using the Jolly Saint Nick rub-on transfer and a simple stencil set. This tutorial features Melissa Bradshaw of Junk and Craft Treasures, who walks through a quick, repeatable process perfect for orders and craft shows.
Santa Cutting Board — Jolly St. Nick Transfer
- Wood cutting board (small to medium size)
- Dark walnut water-based stain
- Clean towel
- Fine sandpaper (light grit, e.g., 600)
- Jolly Saint Nick Rub-On Transfer — essentialstencil.com
- July 2025 Stencil of the Month (Basic Set) — Stencil of the Month Club
- Stencil brush or stencil brush set — Stencil Brush Set
- Mini stencil brush set (optional) — Mini Stencil Brush Set
- Essential Rub-On Transfer Tool — transfer tool
- White craft paint (for snowflakes & postmark)
- Dotting tool or a small round tool for paint dots
- Clear spray sealer + dead flat matte varnish (water-based safe)
Step-by-step Instructions
-
Stain the board.
Apply a dark walnut water-based stain to the face and sides of your cutting board until evenly covered. Use a blow dryer on low heat to speed drying if needed.

-
Wipe off excess stain.
Use a clean towel to remove any excess stain and reveal a cleaner finish. Let the board dry fully before sanding.

-
Lightly sand.
Lightly sand the face to smooth the surface and remove any raised grain or glue residue. A very light grit (e.g., 600) works well.

-
Prepare and apply the rub-on transfer.
Cut out your chosen Santa from the Jolly Saint Nick transfer pack. Position it on the board, then burnish firmly with the transfer tool until the design fully adheres. If the area is a little damp from stain, allow more drying time — transfers require a fully dry surface.

-
Clean up glue/adhesive edges if needed.
If you see any white adhesive film or glue around the transfer edges, remove it with a very light sanding motion. Go gently to avoid damaging the transfer.

-
Stencil the North Pole postmark and snowflakes.
Pull the North Pole postmark from the July 2025 Basic Set and place it beside Santa. Stencil with white paint using a stencil brush (offload excess paint first). Add snowflakes across the board from the same set.

-
Fill and dot for snowy texture.
Fill small snowflakes with white paint as needed. Use a dotting tool to add random tiny white dots across the board for an extra snowy effect.


-
Seal the board.
Lightly spray a clear sealer to set the water-based paint, then finish with a coat of dead-flat matte varnish for protection. Allow full cure before handling or selling.

- Always be sure the stain is completely dry before applying transfers — even a slight tackiness can prevent a clean transfer.
- Offload paint on a paper towel before stenciling to avoid bleed under the stencil. Short, light dabbing motions work best.
- If you see glue or adhesive film after transfer, a very light circular sanding will remove it without harming the image.
- Use a dotting tool for perfectly round snow dots — it’s faster and more consistent than the back of a brush.
- Consider keeping a small stock of finished boards for craft shows — this Santa is a proven seller and the transfers move quickly.
Love this look? Grab the supplies and transfers to make your own — the Jolly Saint Nick transfer and the Stencil Brush Set are great starting points.
For project inspiration and more demos, check out Melissa Bradshaw on Facebook: Junk and Craft Treasures.