
DIY Tic-Tac-Toe Board (12×12) — Handmade Gift Idea
Hi friends — Melissa Miller from Millers Rustic Sawmill walks us through a simple, giftable tic-tac-toe board made with the Essential Stencil 12×12 stencil set. This project is quick, versatile, and totally customizable — perfect for holiday or everyday gifting.
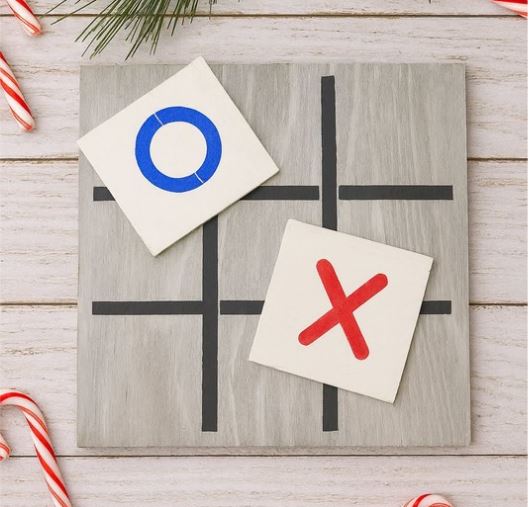
Tic-Tac-Toe Board (12×12)

Materials
- 1 — 12×12 wooden board (prepared and dry)
- 8 — small square wooden boards (matching set for Xs & Os)
- Tic Tac Board 12x12 4pc Stencil
- Stencil Brush Set | Pure Natural Bristle Brushes
- Silver paint (background)
- White paint (small squares base)
- Red paint (Xs)
- Blue paint (Os)
- Stencil tape, stencil brush, regular paintbrush or chip brush, paper towels or wipes
- Optional: hair dryer for speeding dry time

Step-by-Step Instructions
- Prep the wood. Make sure your 12×12 board and eight small squares are clean and fully dry.
-
Paint the 12×12 background silver. Use tissue, a paper towel, or a soft cloth to apply silver paint evenly across the face and all sides of the 12×12 board. Set aside to dry (a hair dryer speeds this up).

-
Paint the small squares white. Use a regular paintbrush to fully cover each of the 8 small boards in white. Let dry. (These become the X and O tiles.)

-
Stencil the grid. Tape the Tic Tac Toe Board Lines stencil onto the dried silver board so it sits square and centered. Use a stencil brush loaded lightly with black (or “pavement” gray) and stencil the grid lines with a gentle stipple technique. Set aside to dry.

-
Make the X tiles (4 pieces). Position the X stencil on a white small board. Use red paint and a stencil brush with a light stippling motion. Repeat for 4 pieces.

-
Make the O tiles (4 pieces). Use the O stencil and blue paint on the remaining 4 white small boards. Let all tiles dry fully.

- Finish & play. Inspect tiles for any touchups. Optionally seal with a clear coat. Arrange the Xs and Os on the grid and enjoy — it makes a great gift or reversible display piece.
Helpful Tips
- Stipple, don’t swirl. Light stippling prevents paint bleed under the stencil for crisp lines.
- Use wipes for smooth coverage. Melissa prefers using a baby wipe or a damp cloth to spread metallic paint smoothly on large surfaces.
- Test paint on the silver background. Metallic backgrounds can make some light colors disappear. Try a test dot first and switch to a darker shade (like pavement/black) if needed.
- Make it reversible. Paint the back side for a second seasonal look — Melissa suggests doing a neutral side and a holiday side for more gifting options.
- Work in small sections and dry between layers. A hair dryer helps speed things along without shifting the stencil design.