
 Fall 2026
 🍂 Harvest Blessing: A Vintage-Inspired Plaque with a Touch of Golden Glow
Featuring Melissa Bradshaw
Give a simple wood plaque a beautiful autumn makeover with the Harvest Blessing Transfer! Layer distressed ...


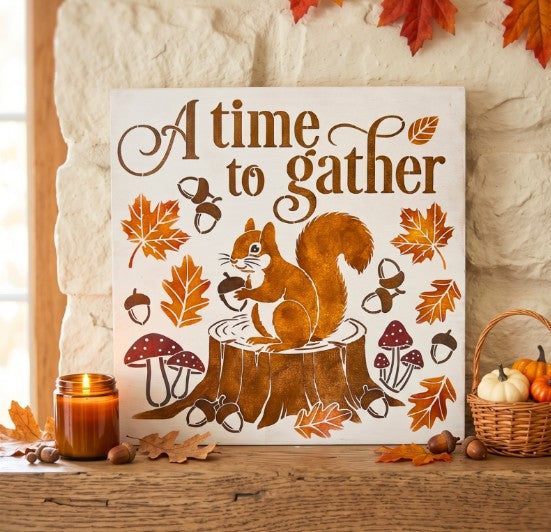
Fall is the perfect season for warm colors, cozy gatherings, and handmade décor that welcomes family and friends. In this tutorial, Melissa Bradshaw of Junk and Craft Treasures shows how easy it is to create a beautiful layered fall sign using the A Time to Gather Stencil.
By layering inexpensive craft paints with dry-brush stenciling techniques, you'll create depth, dimension, and beautiful autumn colors that make this woodland design come to life.

Paint your 11.5" x 11.5" wood board with white craft paint. Allow it to dry completely before applying a second coat for a smooth, even finish.
Two thin coats provide better coverage than one thick coat and create the perfect surface for stenciling.

Secure the A Time to Gather Stencil with painter's tape. Using a stencil brush, apply a light brown base coat to the squirrel.
Once dry, lightly layer a darker brown over selected areas to create natural shading and dimension.

Stencil the tree trunk using two shades of dark brown. Build the color gradually, allowing each layer to dry before adding more paint.
Layering multiple shades creates realistic depth without overwhelming the design.

Using the same dry-brush technique, stencil the "A Time to Gather" wording with your darkest brown paint.

Fill in the acorns using the same dark brown color to keep the design cohesive.

Mix a small amount of black and white paint to create a soft gray for the mushroom bases. Then use black paint to stencil the squirrel's eye and whiskers for extra definition.

With clean stencil brushes, randomly add yellow, orange, and red paint to the leaves. Blend the colors together using light circular motions.
Don't worry about perfection. The layered colors create a realistic fall foliage effect.

Add a second coat of red paint to the mushroom caps for richer color and better coverage.

Lightly dry brush metallic gold over the acorn caps and the wording to create a soft shimmer that catches the light.

Use a dotting tool or the end of a paintbrush to add white dots to the mushroom caps. Allow everything to dry completely before carefully removing the stencil.

The finished sign features warm autumn colors, layered shading, and just a hint of gold shimmer—making it a beautiful addition to mantels, entryways, shelves, or fall gallery walls.
Melissa's layered painting technique shows just how much dimension you can achieve using simple craft paints and quality stencil brushes. Whether you're decorating your home for autumn or creating a handmade gift, this project is a fun way to celebrate the season.
Want to see Melissa's complete process from start to finish? Watch the full video tutorial below and follow along as she shares her favorite layering and blending techniques for creating this charming fall sign.
Ready to make your own?
``` Fall 2026 Featuring Melissa Bradshaw

 Fall 2026
 Featuring Cindy Berry

