
Welcome to the Nut House — Nutcracker Cutting Board Tutorial
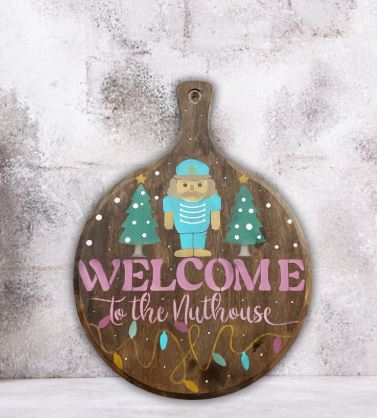
A cheerful, gingerbread-inspired cutting board decorated with the Nutcracker Welcome Door Hanger stencil. This project was demoed by Essential Stencil ambassador Melissa Bradshaw of Junk and Craft Treasures. Follow these steps to create a colorful, food-safe board perfect for holiday serving or décor.
Welcome to the Nut House — Cutting Board Project
This single-layered, multi-step stencil project uses layering techniques and bright, gingerbread-inspired colors to create a playful nutcracker motif on a round cutting board. The finished board is sealed and finished with a food-safe oil so it can be used for serving.


Materials
- Round cutting board (unfinished wood)
- Dark walnut water-based wood stain
- Light sanding block or sandpaper
- Nutcracker Welcome Door Hanger Stencil
- Stencil Brush Set | Pure Natural Bristle Brushes
- Mini Stencil Brush Set (4pc)
- Acrylic paints: turquoise, brown, taupe, lavender (purple + white), cranberry (red + white), gold/yellow, white, green, pink, light green
- Small plate or paint palette, paper towels for offloading
- Frog tape or painter’s tape
- Hair dryer (optional — speeds drying)
- Food-safe hemp oil or mineral hemp oil to finish (make board food safe)
Step-by-step Instructions
-
Stain the board. Apply a thin, even coat of dark walnut water-based stain with a brush. Wipe off excess with a towel for a cleaner finish. Use a hair dryer to speed drying if desired.
-
Sand lightly. Once fully dry, sand the board lightly to smooth the surface and create a rustic look where desired. Blow off dust.
-
Position and tape Layer 1 of the stencil. Use frog tape to hold the stencil steady. If your board is slightly irregular, you can manipulate the stencil placement so the key elements fit.

- Fill Layer 1 elements. Using a stencil brush and offloading technique (tap, don’t brush), fill the trees with green and the branches with a brown. Offload excess paint to avoid bleeding.
-
Fill the Nutcracker body. Paint the nutcracker’s outfit turquoise (the demo used “Azure”). Use a slightly larger brush for the body and smaller brushes for details.

-
Add stars and small accents. Use a mini brush to fill stars above the trees with yellow. These small details make the design pop.

-
Add the words. Mix purple + white for the word “Nutcracker” and a cranberry (red + white) for the phrase “to the Nuthouse”. Carefully stencil the letters; remove the stencil once paint is dry enough to hold.

-
Align Layer 2 and add whites. Reposition Layer 2 to add snow, buttons, and white accents. Use white paint for snow and the nutcracker’s buttons.

-
Paint the face, arms, and small details. Lightly base the face area with a thin white wash so taupe shows up on the dark board. Then fill the face, arms, and feet with taupe. Add features (eyes, eyebrows) with a mini brush and black paint.


-
Reposition Layer 1 for light strings and fill them gold. Use a gold or muted yellow to paint the string and add color bulbs afterward. This adds the gingerbread festive feel.

-
Realign Layer 2 and paint the bulbs. Fill the Christmas lights in a bright, gingerbread palette: turquoise, pink, light green, and yellow. This gives a whimsical, colorful finish.

- Final clean-up and reveal. Touch up any small spots, let paint fully cure (follow paint manufacturer guidance), then seal the board. Wait at least 24 hours after sealing and then rub in a food-safe hemp oil to make the surface food safe for serving.
Helpful Tips
- Offload your brush. Always tap excess paint off the brush onto a towel or palette — this prevents bleeding under the stencil.
- Work light coats. Thin, layered coats give cleaner edges than heavy paint. Let each layer dry enough to hold before the next layer.
- Use a white base for dark boards. A very light white wash under flesh or pastel colors improves contrast on dark-stained wood.
- Seal & oil properly. After paint cures, use a food-safe hemp oil or mineral hemp oil to condition the cutting board and make it safe for serving.
- Stencil alignment. If a stencil doesn’t fit perfectly, split layers or shift them slightly — it’s okay to manipulate placement for the best composition.
Final Reveal
Here’s the finished, gingerbread-inspired Nutcracker cutting board — bright bulbs, pastel accents, and a cheeky phrase that reads “Welcome to the Nuthouse.” Perfect for serving holiday snacks or propped on a shelf.
