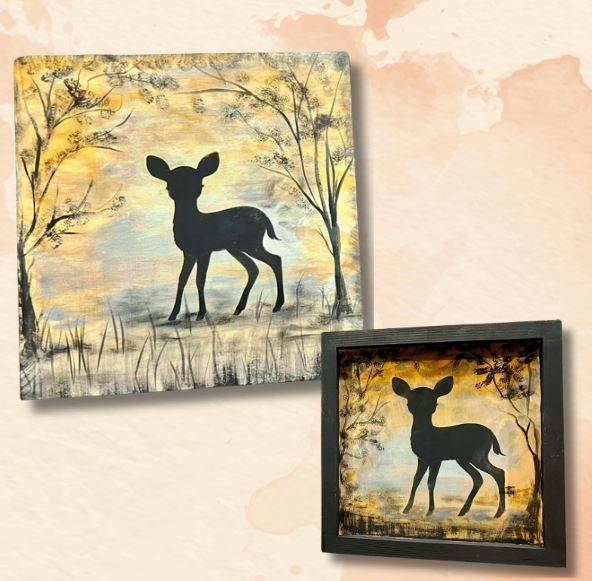

Woodland Deer Silhouette on an Autumn Sky
Hi friends! It’s Tammy Muto of Cheers to Creativity, sharing a cozy fall art project using the Woodland Silhouettes Stencil Set. We’ll layer a soft sunset sky and finish with a bold deer silhouette on a 10x10 wood panel—simple steps, beautiful results.
Jump to:
Materials
- Woodland Silhouettes Stencil Set (6pk)
- Mini Stencil Brush Set (4pk)
- Detail Brush Set (6pk)
- 10x10 wood panel
- Paints: Winter Blue, Pumpkin Spice (orange), Antique Gold or True Ochre, Graphite (dark grey), White, Baby Duck (light yellow), Black
- Painter’s tape, water cup, paper towels
- Pencil
Step-by-Step Instructions
1) Position & Mark the Deer

Place the deer silhouette in the bottom-right corner. With a pencil, lightly mark where the foot will land. This guides placement later.
2) Brush on a Soft Winter Blue Base

Remove the stencil. Thin Winter Blue with water, then brush it through the middle third of the panel for a gentle, cool backdrop.
3) Blend in Warm Sunset Edges

Lightly apply Pumpkin Spice around the blue area. Use a damp brush to soften the blend inward for that autumn glow.
4) Add Shadowy Depth with Thin Graphite

Thin Graphite with water and lightly dab across the panel to suggest faint leaves and distant shapes. Keep it sheer.
5) Create a Soft Glow in the Center

Thin white paint and brush a light glow in the center area to highlight where the deer will sit.
6) Stencil a Yellow Halo

Tape the deer stencil back in place. Using a mini brush, stencil Baby Duck (light yellow) just along the edges to create a soft glow.
7) Fill the Deer Silhouette in Black

Let the yellow dry. Then fill the entire silhouette with black for strong contrast.
8) Brush in Ground & Grasses

Lightly brush black along the bottom edge to form ground. Flick upward for grassy blades.
9) Dab Leafy Textures in the Corners

Using a scruffy brush, dab black paint into the top corners to frame the scene with leaves.
10) Add Branches & Extra Grass with a Detail Brush

With a detail brush, paint a slim trunk and branching limbs. Vary pressure so branches taper naturally. Add a few taller grasses to balance the bottom.
Final Reveal

Helpful Tips
- Dry between layers. This prevents blue + orange from turning muddy (or green).
- Thin paints with water for soft, sheer layers and easier blending.
- Want a softer silhouette? Mix a touch of Graphite into your black.
- Branches look natural when they taper—lighter pressure as you move outward.
Watch the Full Tutorial
Prefer to follow along in real time? Watch Tammy’s step-by-step video: YouTube Tutorial
Shop the Supplies: Woodland Silhouettes Stencil Set | Mini Stencil Brush Set | Detail Brush Set
Ready for more fall makes? Explore our full Stencil Collection.