
3 Quick Valentine + Winter Upcycle Projects (Rub-On Transfers & Simple Stenciling)
These small, giftable projects pair easy stenciling with rub-on transfers for fast, polished results. They were demonstrated by Sharon Hankins (I Restore Stuff) — expect practical tips, transfer tricks, and ideas you can replicate in one crafting session.
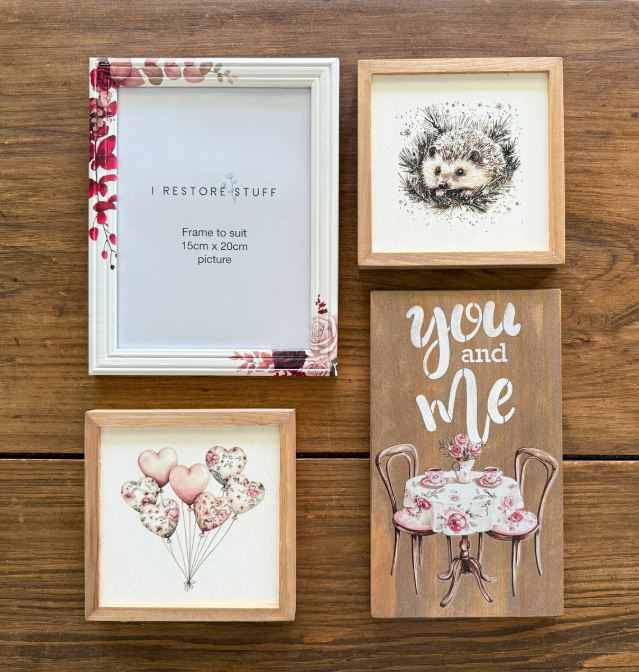
Project 1 — You & Me Pine Board
Materials
- Pre-stained pine board (stained in a warm WoodWick tone)
- I Love Us Mini Stencil Set — “You & Me” stencil
- Stencil brush set (pure natural bristle)
- White paint (Fusion Casement recommended)
- Chinoiserie Valentine Rub-On Transfer Set — table & chairs
- Essential Rub-On Transfer Tool
- Cardboard for offloading the brush, paper towel
- Light sealer (Fusion Tough Coat suggested)
Follow these steps.
- Wipe the board to ensure it’s clean and fully dry.
- Position the “You & Me” stencil toward the top portion of the board and secure it (finger pressure or low-tack tape).
- Offload the stencil brush on cardboard until it’s dry to the touch. Using short, circular taps, fill the stencil with white paint. Less paint on the brush = crisp edges.
- Remove stencil and let paint dry completely.
- Cut the table-and-chair transfer from the Chinoiserie Valentine sheet. Remove the paper backing and position it on the lower area of the board.
- Burnish the transfer firmly with the transfer tool until all elements are adhered. Lift gently — if anything peels, press back down and burnish again.
- Seal the finished board lightly with a clear sealer (one thin coat) to protect the transfer and stencil paint.


Helpful Tips
- Dry brush technique: offload most paint onto cardboard first for clean stencil edges.
- Store transfers in a cool, dry place. Heat shortens shelf life.
- If a transfer edge lifts, lay it back down and rub again — layering over small bits is fine.
- Seal sparingly — too much sealer can fog the sharpness of transfers.

Project 2 — Rose-Accented White Frame
Materials
- Pre-painted white frame with a solid MDF backing (not cardboard)
- Rose Rub-On Transfer Set
- Essential Rub-On Transfer Tool
- Scissors, fingernail or small burnisher for tight grooves
- Optional: a matte black paint if converting to chalkboard in another project
Follow these steps.
- Clean the frame edge and remove any hardware that blocks access to the groove.
- Choose floral elements from the Rose transfer sheet. Trim close to the motif for easier placement.
- Peel the paper backing and lay the transfer across the frame edge. Press and burnish into ridges and grooves. Use your thumbnail or the tool to press into small crevices.
- Wrap small motifs around corners carefully. If a piece lifts while burnishing, set it back down and rub again until fully adhered.
- Insert glass and photo (or leave empty for a decorative frame). Add a thin sealer if the frame will be handled frequently.


Helpful Tips
- Trim transfers into small sections to work around molded edges and corners.
- Work slowly around ridges: press firmly and re-rub any lifted edges.
- Use a frame with MDF backing for best painting and sealing results.

Project 3 — Framed Duo with Balloons & Hedgehog
Materials
- Two small framed boards stained in a WoodWick tone
- Chinoiserie Valentine Rub-On Transfer Set — heart balloons
- Winter Pines & Critters Rub-On Transfers — hedgehog
- Essential Rub-On Transfer Tool
- Scissors and a small burnisher
Follow these steps.
- Prepare both framed boards. Make sure surfaces are clean and dry.
- Trim the balloon motif from the Chinoiserie Valentine sheet and position on the first board. Burnish until fully transferred.
- Trim the hedgehog motif from the Winter Pines & Critters sheet and apply to the second board the same way.
- Check edges and re-rub any spots that need extra adhesion. Trim stray film with scissors.
- Arrange the two framed pieces as a duo for a shelf display or a little wall vignette. Seal if pieces will be handled often.


Helpful Tips
- Choose transfer motifs that match the scale of your board. Tiny boards need smaller motifs.
- For tiny pieces or grooves, use a fingernail or the tip of the transfer tool to press into crevices.
- Layer small transfer pieces for a custom composition — transfers will stick over each other.

About the demo: These projects were demonstrated by Sharon Hankins of I Restore Stuff. The demo is full of practical, walk-through tips on burning and layering transfers.
Ready to shop the exact items used? Try the Chinoiserie Valentine Rub-On Transfer Set or explore the full transfers collection to mix and match motifs.