
 Fall 2026
 🍂 Harvest Blessing: A Vintage-Inspired Plaque with a Touch of Golden Glow
Featuring Melissa Bradshaw
Give a simple wood plaque a beautiful autumn makeover with the Harvest Blessing Transfer! Layer distressed ...


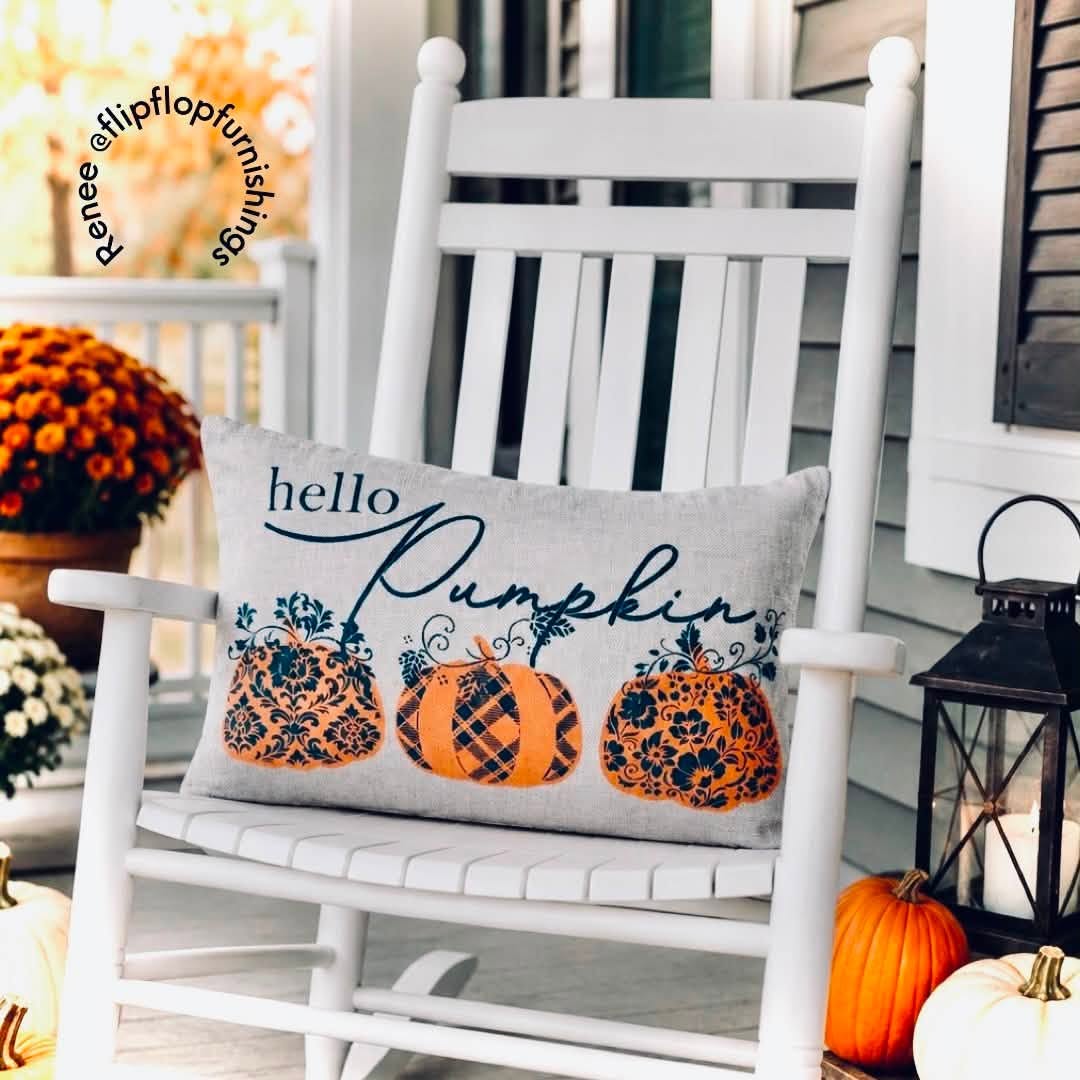
Bring a little modern fall charm to your home with this easy Hello Pumpkin pillow cover! Using warm Coral, cool Seaside blue, and the layered patterns from the August 2026 Stencil of the Month Premium Set, you can create a cozy seasonal accent with plenty of personality.
This project is beginner-friendly and a great way to see just how beautifully stencils work on fabric. The key is using textile medium with your acrylic paint and keeping your stencil brush lightly loaded.
Helpful note: Mixing acrylic paint with textile medium helps turn the paint into a washable fabric paint while keeping the finished design soft and flexible.

Start by placing two hard backing sheets inside the pillow cover. This creates a firm, flat surface for stenciling and helps prevent paint from transferring through to the other side.
For the paint, mix approximately two parts Coral acrylic paint to one part textile medium. Stir well before beginning.


Grab the large pumpkin stencil from the August 2026 Stencil of the Month Premium Set. Position it toward the bottom center of the pillow cover and secure it with stencil tape.
Load a larger stencil brush with the Coral paint mixture. Offload the excess paint before stenciling. This is especially important on fabric because the paint can absorb quickly.
Use a light tapping motion to fill the pumpkin. Allow the first pumpkin to dry completely before carefully lifting the stencil.

Reposition the same pumpkin stencil beside the center pumpkin. Fill it with Coral paint, allow it to dry, and repeat on the opposite side.
You should now have a trio of pumpkins running across the bottom of the pillow.
Once the pumpkins are completely dry, it's time to add the layered patterns.

Start with the plaid pattern stencil. Position it over the center pumpkin and use a clean, smaller stencil brush to apply Seaside paint mixed with textile medium.
The overlay makes it easy to line the pattern up with the pumpkin and create a detailed look without complicated painting.

For one side pumpkin, use the floral pattern stencil. Fill the design with the same Seaside paint and allow it to dry completely.

Finish the pumpkin trio with the damask pattern stencil on the remaining pumpkin. Apply the Seaside paint and let it dry.

Now add some of the coordinating mini floral vines and flourishes from the stencil set.
Position the designs randomly above the pumpkins and fill them with Seaside paint. There's no need to make the placement perfectly symmetrical. Random placement gives the design a more natural, playful feel.

For the finishing touch, position the Hello Pumpkin stencil just above the pumpkins.
Apply the Seaside paint using a light first coat. Allow it to dry completely, then add a second coat for richer, more vibrant coverage.
Keeping the sentiment in the same Seaside blue ties all of the layered details together.

Once the entire design is completely dry, follow the instructions on your textile medium to heat-set the design.
And that's it! This Hello Pumpkin pillow uses just two main colors, but the layered plaid, floral, damask, and vine details give it plenty of personality.
It's a simple way to add a handmade touch to your fall decorating—and you can easily change the colors to match your own space.
Gather your favorite fabric surface, stencil brushes, and a couple of coordinating colors, then create your own seasonal pillow with the August 2026 Stencil of the Month Premium Set.
For the finishing touch, add the Hello Pumpkin stencil set and turn your project into a cozy fall accent.
Happy stenciling!
Want to see this project come together step by step? Watch the full tutorial below!
Fall 2026 Featuring Melissa Bradshaw

 Fall 2026
 Featuring Cindy Berry

