
 Fall 2026
 🍂 Harvest Blessing: A Vintage-Inspired Plaque with a Touch of Golden Glow
Featuring Melissa Bradshaw
Give a simple wood plaque a beautiful autumn makeover with the Harvest Blessing Transfer! Layer distressed ...


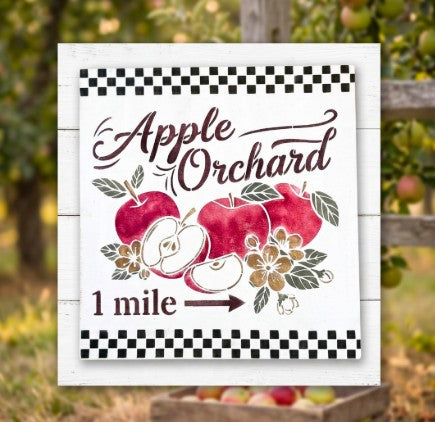
Nothing says fall quite like crisp apples, cozy farmhouse décor, and an easy stencil project! In this tutorial, Essential Stencil ambassador Melissa Bradshaw of Junk and Craft Treasures shows how to combine two stencil designs to create a custom Apple Orchard sign that's perfect for autumn decorating.
One of the best things about reusable stencils is the ability to mix and match designs. By pairing the Apple Orchard Stencil with the checkered border from the An Acorn in Your Pocket Stencil, you can create a unique farmhouse-inspired sign that's full of seasonal charm.

Paint your 9.5" x 10" wooden board with white paint. Allow it to dry completely before applying a second coat if needed.

Position the checkered border along the top edge of the board and secure it with painter's tape. Offload most of your black paint onto a shop towel until the brush feels nearly dry. Using a swirling motion, stencil the design across the board. Repeat the process along the bottom edge to create a matching frame.

Center the Apple Orchard stencil on the board and secure it with tape. Mix bright red paint with a small amount of black to create a rich apple red. Stencil the wording and arrow first, allowing the paint to dry before adding another coat if desired.

Using a mini stencil brush, fill each apple with the deep red color. Apply the paint with a swirling motion and add slightly more paint in selected areas to create natural depth and dimension.

Switch to another clean mini stencil brush and stencil the leaves using a muted green paint.

Finish the stems, seeds, and flower details using a muted iced coffee brown. Saving the brown until last helps cover any tiny areas where the red may have overlapped.

Your finished Apple Orchard sign is ready to display! The classic checkered border beautifully frames the design and shows just how easy it is to combine stencil sets for a completely custom look.
Ready to make your own Apple Orchard sign? Shop the Apple Orchard Stencil, pair it with the An Acorn in Your Pocket Stencil, and complete your toolkit with the Mini Stencil Brush Set to create beautiful handmade fall décor you'll enjoy for years to come.
Follow along with Melissa Bradshaw of Junk and Craft Treasures as she creates this charming Apple Orchard Fall Sign using Essential Stencil designs. Watch the full tutorial below for step-by-step techniques and helpful stenciling tips!
Fall 2026 Featuring Melissa Bradshaw

 Fall 2026
 Featuring Cindy Berry

