
 Fall 2026
 🍂 Harvest Blessing: A Vintage-Inspired Plaque with a Touch of Golden Glow
Featuring Melissa Bradshaw
Give a simple wood plaque a beautiful autumn makeover with the Harvest Blessing Transfer! Layer distressed ...


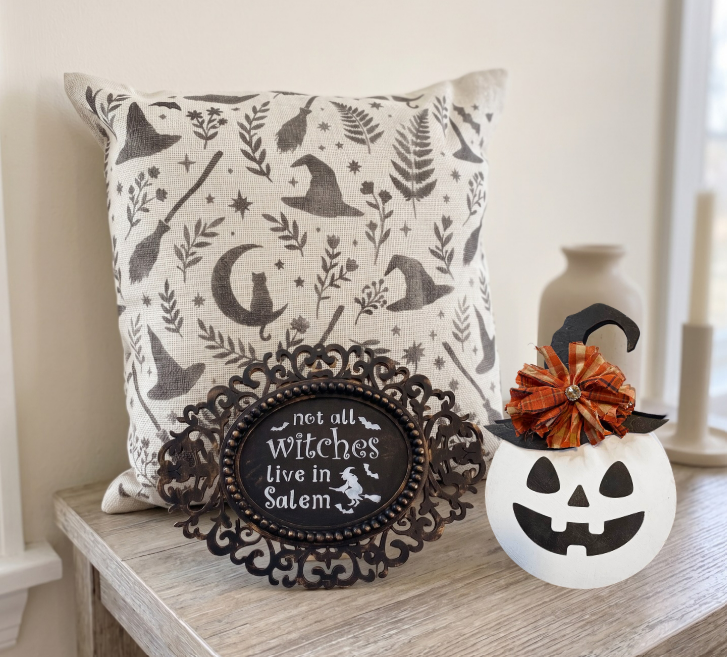
Halloween decorating doesn’t have to mean starting with complicated supplies or expensive seasonal décor. In this tutorial, Melissa from Junk and Craft Treasures shows us how to turn a few simple surfaces into fun Halloween pieces using Essential Stencil designs.
From a cute Jack-O’-Lantern pumpkin to a witchy statement sign and a patterned pillow, these projects are easy to customize with whatever surfaces and embellishments you have on hand.
Melissa’s biggest reminder? Don’t be afraid to make your stencils work for you. Recycled materials, cardboard, different wood shapes, and your own creative touches can all be part of the project.
Before you get started, gather your favorite stencil brushes, paint, and a few surfaces that are ready for a Halloween makeover.
This Jack-O’-Lantern project is a quick and playful way to create Halloween décor. Melissa uses a simple round wood piece and a separate hat, but you can easily adapt the idea to another surface.
You don’t need the exact wood pieces. Recycled materials, cardboard, or other surfaces can work beautifully. The goal is to use what you have and make it your own.
Gather your round wooden pumpkin piece and separate hat piece. Make sure both surfaces are clean and dry before painting.

Paint the circular pumpkin piece white and the hat black. Add additional coats as needed for good coverage, then allow both pieces to dry completely.

Choose your favorite design from the Jack O’ Lantern Face Stencils and position it in the center of the round piece. Secure the stencil with tape.
Load your stencil brush with black paint, then offload the excess paint before stenciling. Melissa likes to swirl her brush, but you can pounce if that feels more comfortable.
Build the color gradually rather than applying too much paint at once. Carefully lift the stencil when finished and let the design dry.

Apply glue or your preferred adhesive to the bottom back portion of the hat.

Attach the hat to the top of the pumpkin. Then add ribbon, fabric, or any other embellishments you like.
Don’t worry about small mistakes. As Melissa says, most little imperfections are easy to fix with a touch of paint.


Turn a simple wood cutout into a Halloween statement piece with the “Not All Witches Live in Salem” design from the Broom Parking Stencil Set.
This project is especially easy to customize because you can adjust the stencil placement to suit the size and shape of your surface.
Start with a decorative oval wood cutout. If the surface needs a little smoothing, lightly sand it before painting.

Paint the entire surface black and allow it to dry completely.
Don’t overwork the paint. Melissa recommends getting good coverage without adding too much moisture, especially when working with thinner wood.

Take the “Not All Witches Live in Salem” stencil from the Broom Parking Stencil Set. Position it horizontally across the center of the board and secure the sections you need with tape.
Using a stencil brush, lightly apply white paint over the lettering.
Remember: it’s easier to add more paint than to fix too much. Start light and build your coverage.

Once the paint is dry, use Rub ’n Buff Gold Wax Finish around the frame or edges of the piece. Start with a small amount and build the shimmer until you like the effect.
If you don’t have Rub ’n Buff, you can also use gold paint with a dry-brushing technique.


For the final project, Melissa takes the Halloween design beyond wood and onto fabric. The Spellbound Witch Pattern Stencil makes it easy to create a repeating design across a pillow cover.
Place a piece of cardboard or another hard backing sheet inside the pillow cover. This creates a firm, flat surface for stenciling and helps keep paint from transferring through to the other side.

Position the Spellbound Witch Pattern Stencil on the pillow cover and secure it with tape.
Using a stencil brush, lightly apply black paint over the design. Fabric can absorb more paint than wood, but you still want to build the color slowly.
When you’re ready to continue, move the stencil and line up the repeating elements. Take your time with the alignment so the pattern flows naturally across the pillow.

Allow the paint to dry completely before carefully removing the backing sheet. Insert your pillow filler and fluff the finished cover into shape.


This tutorial features Melissa from Junk and Craft Treasures, whose relaxed, creative approach makes these projects feel approachable and fun. Melissa is all about making your supplies work for you and adding your own personality along the way.
Visit Melissa at Miller’s Rustic Sawmill on Facebook
These three projects are a great reminder that you don’t need complicated supplies to create something special. Grab your favorite Essential Stencil designs, choose a surface, and make the project your own.
Start with the Halloween Collection and find a stencil for your next DIY.
Fall 2026 Featuring Melissa Bradshaw

 Fall 2026
 Featuring Cindy Berry

