
 Fall 2026
 🍂 Harvest Blessing: A Vintage-Inspired Plaque with a Touch of Golden Glow
Featuring Melissa Bradshaw
Give a simple wood plaque a beautiful autumn makeover with the Harvest Blessing Transfer! Layer distressed ...


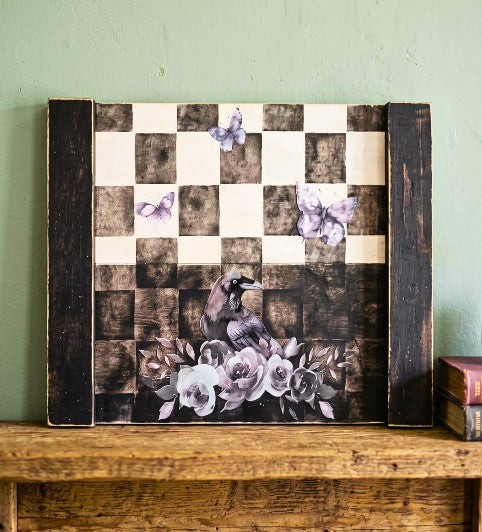
Give a simple wood tray a little Halloween-ish personality with paint, a bold checkerboard pattern, and the beautiful Mystical Garden Transfers.
In this project, Melissa Bradshaw of Junk and Craft Treasures combines deep black, crisp white, and touches of purple for a tray that works beautifully for everyday seasonal decorating. The best part? You can easily change the colors or transfers to make the design your own.
Start with two larger wood planks and two smaller pieces for the tray sides. Melissa's original pieces were approximately 15" x 5¼" for the larger boards and 10⅜" x 2¾" for the smaller side pieces.

Make sure every piece is clean and completely dry before painting.
Paint both larger panels white using a chip brush or paint brush. Apply a thin, even coat and allow it to dry completely.

If you can still see some of the wood after the first coat, that's okay. Let the first coat dry before adding a second coat.
Paint both smaller side pieces black. One coat is enough because you'll be sanding the edges later to create a distressed finish.

Once the paint is dry, join the two large white panels together.

For a live project where you need an immediate hold, Melissa used a little Stick Fast with hot glue.
Now it's time for the bold background. Position the Large Checker Pattern Stencil across the joined panels.

Less paint is better when stenciling. Too much paint can seep beneath the stencil and blur those crisp checkerboard lines.
Once the checkerboard is completely dry, lightly sand the board.

This is a great way to soften small imperfections or areas where the paint went slightly outside the lines.
Before adding the crow transfer, create a darker area behind it so the design stands out from the checkerboard.

Blend black paint into the center-bottom portion of the board. You don't need to cover the entire checkerboard. The goal is to create enough contrast for the crow to become a focal point.
Trust the process. A little layering can make a big difference once the transfer is added.
Once the paint is completely dry, it's time for the fun part.
Choose the crow and a few butterfly designs from the Mystical Garden Rub-On Transfer Set.

The darker purples and blacks in the Mystical Garden collection work beautifully against the checkerboard background.
For the lower portion of the design, place a strip of tape across the center of the board to create a clean division. Lightly apply black paint to the bottom section and allow it to dry completely.

This darker section helps anchor the crow and gives the finished design more contrast.
Once the black side pieces are dry, lightly sand their edges.

Sand just enough to create a rustic, worn look without removing too much paint.
Apply adhesive along the bottom edges of the smaller panels and attach them to the sides of the finished board.

Check that each side is straight before the adhesive sets. Allow the adhesive to cure according to the manufacturer's directions.
And there you have it! A bold checkerboard tray with a little mystical character.

The checkerboard creates a playful background, while the crow, butterflies, and purple details from the Mystical Garden Transfers add just the right amount of Halloween-ish charm.
Melissa's reminder is one worth keeping in mind: sometimes the project in your head needs a few adjustments along the way. That's part of creating. It's just paint, and most things are fixable!
Use this tray for everyday decorating, seasonal displays, or as a starting point for your own color and transfer combinations.
Shop the Mystical Garden Rub-On Transfer Set and pair it with the Large Checker Pattern Stencil to recreate this look or put your own spin on it.
Want to see Melissa bring this mystical checkerboard tray to life? Watch the full tutorial below for the step-by-step process and helpful tips along the way!
Fall 2026 Featuring Melissa Bradshaw

 Fall 2026
 Featuring Cindy Berry

